Saturday, November 5, 2011

iolo System Mechanic Free Edition <<< Download


Download iolo System Mechanic Free Edition with Free License Key.

How to Install iolo System Mechanic and obtain the license key

* Download installer iolo System Mechanic on the official website. The installer of the official website is online installer, I’m not see the offline installer
* Run the online installer, it will download the offline installer of the software.
* After download process finished, run the installation process and select “Install the free version of System Mechanic” then click next


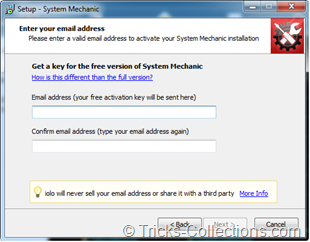
*On the next steps installation process, enter a valid email address. This steps is an important, because the license key will be send to your email that you use in this steps.


*Click next then follow the installation process until it finish.

Magic Collage v2.3 <<< Download


Magic Collage v2.3 (1.08MB)
Magic Collage is an automatic and easy to use photo collage creator software that lets you to create impressive photo collage automatically in a few clicks!
Magic Collage creates photo collage by using a special photo processing engine that can automatic place and arrange the photos from different graphic, shape and text that you specify.
Feature:
1. Create photo collage automatically from graphic and text.
2. Real-time result preview.
3. Intuitive user interface.
4. Save photo collage as Photoshop file(*.psd).

Epson Adjustment Program <<< Download


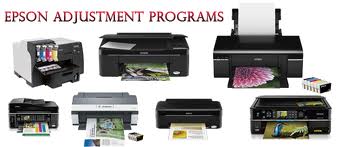
Epson Adjustment Program (Software Resetter for Epson Printer)
Adjustment Program Epson C Series:
* Adjustment Program Epson C41, C42, C43, C44, C45, C46
* Adjustment Program Epson C58
* Adjustment Program Epson C59
* Adjustment Program Epson Stylus C63 , C64
* Adjustment Program Epson C67, C68, D68
* Adjustment Program Epson C79
* Adjustment Program Epson Stylus C82
* Adjustment Program Epson Stylus C83-86
* Adjustment Program Epson C87, C88, D88
* Adjustment Program Epson C90 Indonesian Version
* Adjustment Program Epson C90 Singapore Version.
* Adjustment Program Epson C110
* Adjustment Program Epson C480
* Adjustment Program Epson C580
* Adjustment Program Epson C660
* Adjustment Program Epson C670
* Adjustment Program Epson C680
* Adjustment Program Epson C880

Adjustment Program Epson CX Series:

* Adjustment Program Epson CX1390
* Adjustment Program Epson CX1500
* Adjustment Program Epson CX2800 – CX2900
* Adjustment program Epson CX3100
* Download Adjustment Program Epson CX3500-4600
* Adjustment Program Epson CX3700, CX3800, CX3805, CX3810, DX3800, DX3850
* Adjustment Program Epson CX3900
* Adjustment Program Epson CX4100, CX4200, CX4700, CX4800, DX4200, DX4250, DX4800, DX4850
* Adjustment Program Epson CX4900
* Adjustment Program Epson CX5100-5400
* Adjustment Program Epson CX5500, CX5505
* Adjustment Program Epson CX5900
* Adjustment Program Epson CX6300-6600
* Adjustment Program Epson CX7300
* Adjustment Program Epson CX8300
* Adjustment Program Epson CX9300F

Adjustment Program Epson R Series:

* Adjustment Program Epson R200, R210
* Adjustment Program Epson R220 – R230
* Adjustment Program Epson R240 – R245 – R250
* Adjustment Program Epson R270
* Adjustment Program Epson R290 (works with Epson RX610 also)
* Adjustment Program Epson R300 – R310
* Adjustment Program Epson R340, R350
* Adjustment Program Epson R390
* Adjustment Program Epson Photo R800
* Adjustment Program Epson R1800
* Adjustment Program Epson R1900
* Adjustment Program Epson R2400

Adjustment Program Epson RX Series:

* Adjustment Program Epson Photo RX420 , RX425 , RX430
*Adjustment Program Epson RX500, RX510
* Adjustment Program Epson RX600, RX6 2 0, RX630
* Adjustment Program Epson Photo RX640
* Adjustment Program Epson RX650
* Adjustment Program Epson RX690
* Adjustment Program Epson RX700
* Adjustment Program Epson RX6900F

Adjustment Program Epson Stylus Photo series:

* SP1270 Adjustment Program Epson Stylus Photo 1270
* SP1290 Adjustment Program Epson Stylus Photo 1290
* SP1390 Adjustment Program Epson Stylus Photo SP1390
* SP1410 Adjustment Program EPson Stylus Photo 1410 (995k)
* SP2000p Adjustment Program Epson Stylus Photo SP2000P
* SP2100 Adjustment Program Epson Stylus Photo SP2100

Adjustment Program Epson T and TX Series

* Adjustment Program Epson T10
* Adjustment Program Epson T11 (work also with Epson T10)
* Adjustment Program Epson T20
* Adjustment ProgramEpson T30
* Adjustment ProgramT33 (work also with Epson T30)
* Adjustment ProgramT50-EEE
* Adjustment ProgramT50-EHK
* Adjustment ProgramT50-ETT
* Adjustment ProgramEpson T60
* Adjustment Program Epson TX100
* Adjustment Program Epson TX200
* Adjustment Program Epson TX400

Adjustment Program Epson PictureMate (PM) Series

* Adjustment Program Epson PM270/ Epson Picture Mate 270
* Adjustment Program Epson PM250/ Epson Picture Mate 250
* Adjustment Program Epson PM215/ Epson Picture Mate 215
* Adjustment Program Epson PM210/ Epson Picture Mate 210
* Adjustment Program Epson PM-G800/ Epson Picture Mate D800

Other EPSON Software:

* LQ590_2090 Software clear buffer EPSON DotMatrix LQ590 and LQ 2090
* SSCLG Software/SSCServe resetter for almost all epson printers
* Stylus Pro 9600, Adjustment program Epson Stylus pro 9600 (2,24 M)


Canon Service Tools (Software Resetters Canon Printers)

* iPTool support Canon iP1200, iP1300, iP1600, iP1700, iP1800, iP2200, iP2500
* MPTool support Canon MP150, MP160, MP170, MP180, MP450, MP460
* Canon i320
* Canon iP1100, iP2500
* Canon iP1500
* Canon Pixma iP1200, iP1600, ip2200
* Canon Pixma iP1300, iP1700
* Canon Pixma iP1800

Test print software FOR Dotmatrix Printers ( Windows 95, 98, ME)

* 24Pin Test
* 9Pin Test
* 24pin Test(line)

Friday, November 4, 2011

Adobe Reader <<< Download


Download new and previous versions of Adobe Reader

Adobe Software Licensing Agreement
(http://www.adobe.com/products/eulas/reader/x/eula_en_gb.html)

Overclocking Tool OCCT 4.0.0 Beta 16 <<< Download


Overclocking Tool OCCT 4.0.0 Beta 16

ဒီေကာင္ေလးကေတာ႔ OverClock Checking Tool ေလးတစ္ခုပဲျဖစ္ပါတယ္။ စမ္းသပ္ၿပီးေတာ႔ ထြက္လာတဲ႔ အေျဖေတြကိုလည္း ပံုေလးေတြနဲ႔ ထပ္ထုတ္ေပးထားပါတယ္။ ဖိုင္ဆိုဒ္ကေတာ႔ 5.702 MB ပဲရွိပါတယ္။
သူ႔ရဲ႕ Features ေလးေတြကေတာ႔ ေအာက္မွာျပေပးထားပါတယ္.....

သူ႔မွာ ပါ၀င္တဲ႔ Features ေလးေတြက....

Up to 16-core support ( for instance, up to a Quad-Kentsfield or an Octo-Conroe )
Customizable tests ( Duration, Priority, CPU or RAM, ... )
CPU and Motherboard detection
Monitoring support through 3rd party application ( i.e. MBM5, Speedfan and Everest Ultimate Edition 3.50 or above )
Can produce graphs showing temperature and voltages during the test : Unique feature !
Multi-language support

Wednesday, November 2, 2011

Kaspersky Key 1.11.2011 <<< Download


Kaspersky Key 1.11.2011 (536.53 KB)

How to Activate Kaspersky 2011 with License Key (Offline Activation)

If you have got a genuine serial key for kaspersky 2011, then this guide will help you convert kaspersky 2011 serial to key file. With the key file in your computer lets start.

1. Click on the Kaspersky license manager from the main window (seen at lower right).
2. The License management window will now popup with two options for you. Click on the “Activate the application with a new license” option.
3. Disconnect your internet connection and enter this code. T1JVS-NNMBD-K1QTN-SUBP8.
4. Followed by that an error window will be displayed with a message “Activation error:Cannot setup server connection”. Now Click on “OK”.


5. You will now be shown with the window to activate kaspersky 2011 with license key.


6. Just browse and locate your new license key file and done.

How To Make Windows 7 Faster


Follow these guidelines to improve your Windows 7 working speed:

1. Disable the Windows 7 Sidebar and Gadgets
If you never use the Gadgets, and if you want to disable the Windows 7 sidebar, here is how you can do it.
Right click on the sidebar and select Properties. On the properties windows untick the check box showing “Start sidebar when Windows Starts”. From now on windows sidebar won’t start when windows 7 start up.

2. Turn off visual effects
Click Start button , then click Control Panel.
In the search box, type “Performance Information and Tools”, and then, in the list of results, click on the “Performance Information and Tools”. Click “Adjust visual effects”.
Click the Visual Effects tab, choose Adjust For Best Performance, and then click OK.

3. Choose Maximum Performance Power Plan
Advanced power plan settings allow you to adjust a wide range of hardware power-saving and performance features. You can even change the maximum/minimum CPU usage, which can have a huge performance impact when set incorrectly.
Open Power Options by clicking the Start button, clicking Control Panel, clicking System and Security, and then clicking Power Options.
On the Select a power plan page, activate the “High Performance” plan and that’s it.

4. Disable the Windows 7 Aero Theme
The Windows Aero Glass interface for Windows 7 requires a decent video card, you won’t be able to use it on an old computer.
Right click anywhere on your desktop and select Personalize.
In the Personalization window, choose any of the available Basic and High Contrast theme . Windows 7 will apply the new theme automatically.

5. Disable the Windows 7 Search Indexing Feature
In order to speed up the search process, the Search indexing service scans through the files and folders on the Windows system and records information about them in an index file. But it also consumes some resources of the system, so for the users with a slow computer it is beneficial to turn off search indexing. Go through the following simple steps to achieve it.
- Right Click the Computer Icon in the desktop and select Manage.
- Click Services and Applications in the Computer Management window.
- Click on Services.
- You can see a lot of services listed there. Look for Windows Search in that.
- Right Click on Windows Search from the list and choose Properties.
- The Windows Search Properties Window will open up. From Startup type click on the drop down menu and choose Disabled.
- Click Apply then OK and that’s it. The Windows 7 Search Indexing Feature is now disabled.

6. Speed up Windows 7 Taskbar Thumbnail Preview
- Click on Start, enter “regedit” into the search field.
- Goto: HKEY_CURRENT_USER\Control Panel\Mouse
- Double-click on “MouseHoverTime” and change the value to 100 or lower. Your thumbnail previews should appear a lot faster now.

7. Disable the Thumbnail Preview Feature to speed up File browsing
If you want to speed up browsing around in explorer, you might think about disabling thumbnail previews in folders.
- Open Folder Options (Open a “Windows Explorer” window. Click on the Organize button. Click on Folder and Search Options.)
- Click on the View tab.
- Check Always show icons, never thumbnails, then click on OK.

8. Use Automatic Logon to Speed up Windows 7
If you are the only person with access to your PC and feel you don’t need to secure it with a password then you can use automatic logon to save a few seconds. This will boot right to your desktop without any need to enter a password and wait for loading.

Tuesday, November 1, 2011

Skype မွာ ၿမန္မာလို Chat လို ့ရေအာင္ (ေဇာ္ဂ်ီေဖာင့္ သံုးလို ့ရေအာင္)


ေဇာ္ဂ်ီနဲ႔ ခ်က္တင္ လုပ္မယ္ဆုိရင္.....

1/ Tools ကိုႏွိပ္။ ၿပီးရင္ Options ကိုႏွိပ္။

2/ IM & SMS ကို ရွာျပီးႏွိပ္။

3/ IM appearance ဆိုတဲ့ အ၀ါေရာင္ smile ေလးကိုႏွိပ္။

4/ change font ကိုႏွိပ္။ Zawgyi one ကို ေရြး။ font size ကို 11 ေလာက္ထားရင္ အေတာ္ပါပဲ။

5/ Save ကို ႏွိပ္။

ဒါဆုိရင္ Gtalk လုိပဲ ZawGyi_Font ကို အသံုးၿပဳလို ့ရပါၿပီ။

Mobile Applications <<< Download


Mobile Applications
76_Applications.rar (20 MB)

SRS Audio Sandbox 1.9.0.4 + Patch <<< Download


SRS Audio Sandbox 1.9.0.4
(3.3 MB)

ဒီေကာင္ေလးက Realtalk လိုသီးသန္႔ Audio Driver ကို Run ေနစရာမလိုပဲ Audio အတြက္ အသံုးျပဳႏိုင္မွာ ျဖစ္ပါတယ္။ ဒီေကာင္ေလးကို Full Version ေလးသံုးလို႔ရေအာင္ အထဲမွာ Patch File ေလးပါ ထည့္ေပးထားပါတယ္။ အရင္ဆံုး ဒီေကာင္ေလးကို မိမိတို႔စက္မွာ Install လုပ္လိုက္ပါ။ Finish ေပးျပီးရင္ ဒီေကာင္ေလးကို Exit လုပ္ျပီးပိတ္လိုက္ပါ။ ျပီးရင္ Patch File ေလးကို My Computer >> Local Disk ( C: ) >> Program File ထဲက SRS Labs ဆိုတဲ့ Folder ေလးထဲမွာ ထည့္ျပီး Right Click ေပးလိုက္ပါ။ ျပီးရင္ Patch ကိုႏွိပ္ျပီး Patch ခ်ိဳးေပးလိုက္ယံုပါပဲ။ ဒါဆိုရင္ အဆင္ေျပသြားပါလိမ့္မယ္။